A simple pear tart is the perfect vegan dessert to serve during the holiday season. Make these single serve tarts so you don’t have to share it with anyone.
“This post is sponsored by Salemville®, but, all content and opinions are mine”
Don’t you just love desserts during the holidays?
Its is one of the times where you can sit with family and friends while you devour the sweetest desserts without feeling guilty.
In my family, the main course meals are always wolfed down quickly.
For desserts, however, we slow down our forks and spoons. Desserts are, after all, meant to be enjoyed!

In the past, desserts typically include pies, cakes and cupcakes. This year, though, I thought I would try something a little different.
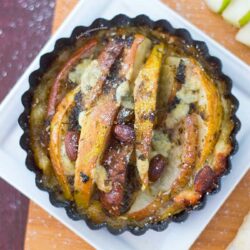
Pears are always unpopular in my home because of the texture. Its rough texture makes them undesirable. Sometimes, I have had to hide them in smoothies just to get people to eat them.
Nobody wants to share desserts during the holiday season. So, make them individual sized and then, you will have no fights at all!
I used these (Affiliate Link) mini tart pans from Wilton to make these pear tarts. If you don’t have these pans, quickly make these mini pie crust to use as a base for these pies.

This time, I put them front and center! In this tart, they were perfectly cooked and everyone savored each spoonfull
The pears are baked to perfection using basil butter and brown sugar. I added a few pistachios for an added crunch.
This recipe was originally topped with gorgonzola cheese. However, I have since removed the cheese from this recipe and kept it vegan friendly.
Have questions about veganism? Consult my handy dandy guide on all things vegan.
Want to get to know pears better? Here is a post all about pears.

I love this tart recipe with apples too. I put apples that are left over from my apple pie trifle.
What’s your favorite way to slow down and enjoy the holidays.
Pear Tart
Ingredients
- 1 Red Anjou Pear
- 1 Bartlett Pear
- 2/3 cup Basil Butter See Note #1
- 2 Tbsp Brown Sugar or Coconut Palm Sugar
- 3 tsp Salemville Gorgonzola Cheese
- 1/4 cup Pistachios Raw and Unsalted
- 1 sheet Puff Pastry See Note #2
Instructions
- Preheat oven to 400° F
- Slice the pears thin and lengthwise
- Melt the basil butter and add the brown sugar. Mix well
- Roll out the Puff Pastry sheet
- Using the tart pan (see note #3), cut out the shape of the tart.
- Roll out the cut out shape a little more and place them inside the tart pan
- Shape the puff pastry in the shape of the tart pan
- Using a knife, make shallow cuts in the bottom of the pastry
- Butter only the bottom of the tart and not the raised edges
- Arrange the pears in a circular pattern. Use the 2 pear types alternatively
- Top with about 1 Tbsp of the Butter and Sugar mixture
- Add the Gorgonzola on the top. I used about 1 tsp per tart
- Finally, add the pistachios on top (About 1Tbsp per tart)
- Place in the oven and cook for about 15 minutes
- Remove and serve (See Note #4)